Ads
Ads
Learn how to contour your face like a professional makeup artist with this detailed step-by-step tutorial covering face analysis, product selection, and application techniques for sculpted, defined features.
Ads
Have you ever watched makeup tutorials and wondered how celebrities and influencers achieve those perfectly sculpted cheekbones and defined jawlines? The secret lies in mastering the art of face contouring technique that has revolutionized the beauty industry. Whether you’re a beginner or looking to refine your skills, this comprehensive guide will walk you through every step to achieve professional-level results in the comfort of your own home. Let’s dive into the world of contouring and discover how you can transform your makeup routine with techniques used by the pros.
Understanding Face Contouring Fundamentals
Face contouring is a makeup technique that uses shadows and highlights to define, sculpt, and enhance your facial structure. The basic principle involves applying darker shades to areas you want to recede or minimize, while using lighter shades to bring forward features you want to emphasize. This creates the illusion of dimension and depth, much like how a photographer uses lighting to capture a more flattering image. Understanding this fundamental concept is crucial before you pick up any product.
The history of contouring dates back to Hollywood’s golden age, where makeup artists used similar techniques to define actors’ features under the harsh studio lights. Today, these methods have evolved and become accessible to everyone, from makeup enthusiasts to professionals. The technique works by manipulating how light interacts with your face, creating natural-looking shadows that enhance your bone structure without appearing heavy or cakey.
Why Contouring Has Become Essential
Contouring has transformed from a red-carpet secret to an everyday beauty staple for several compelling reasons. First, it offers customizable results that work with any face shape, allowing you to enhance your unique features rather than following a one-size-fits-all approach. Second, modern contouring products have evolved significantly, offering blendable formulas that look natural and last throughout the day. Third, the technique provides versatility—you can go for a subtle, natural look or build toward a more dramatic, sculpted effect depending on the occasion.
- Creates the illusion of higher cheekbones and defined jawline
- Balances asymmetrical features naturally
- Enhances facial structure without looking overdone
- Works for all skin tones and face shapes
- Provides long-lasting results with proper application
The beauty of modern contouring lies in its adaptability. What works for round faces differs from techniques for oval or heart-shaped faces, and understanding these nuances will help you achieve the most flattering results. As we progress through this tutorial, you’ll learn how to identify your face shape and apply contouring techniques specifically tailored to enhance your natural beauty.
Analyzing Your Face Shape
Before diving into product application, you need to understand your face shape because this determines where you’ll apply contour and highlight. Stand in front of a mirror with your hair pulled back and trace the outline of your face—you can use a dry-erase marker or simply visualize the shape. Common face shapes include oval, round, square, heart, diamond, and long or rectangular. Each shape requires different contouring approaches to create balance and definition.
If you have a round face, your goal is to create the illusion of length and definition. Focus on contouring the sides of your forehead, the hollows of your cheeks, and along your jawline to create angles. For square faces, soften the angles by focusing on the corners of your forehead and jaw, while emphasizing the center of your chin to create length. Heart-shaped faces benefit from contouring the sides of the forehead and along the hairline to minimize width at the top, while adding definition to the chin.
Identifying Key Contour Zones
Regardless of your face shape, certain zones remain consistent for contouring success. The hairline serves as a starting point, where you’ll apply a subtle shadow to create depth and frame your face. The temples help balance proportions, especially for those with narrower foreheads. The hollows of your cheeks—located directly below your cheekbones—create that coveted sculpted look when properly contoured. The jawline defines your lower face and creates separation between your face and neck, while the sides of the nose can be contoured for a slimmer appearance.
- Hairline: Creates frame and depth at the top of your face
- Temples: Balances forehead width and adds dimension
- Cheek hollows: Defines cheekbones and adds structure
- Jawline: Creates definition and a sculpted lower face
- Nose sides: Slims and straightens the nasal profile
Once you’ve identified your face shape and key contour zones, you’re ready to move on to selecting the right products. This step is crucial because the wrong formula or shade can undermine all your hard work, resulting in a muddy or unnatural appearance.
Selecting the Right Contouring Products
Choosing the right contouring products can feel overwhelming with the countless options available on the market. The key factors to consider include your skin type, preferred finish, and skill level. Understanding the difference between cream, powder, and liquid formulas will help you make an informed decision that suits your needs. Remember, the goal is to create a seamless, natural-looking shadow that blends effortlessly with your skin.
Cream contours offer the most natural finish and work beautifully for dry or mature skin types. They blend seamlessly into the skin, creating a second-skin effect that looks incredibly realistic. However, they require more blending time and work best with synthetic brushes or damp sponges. Powder contours, on the other hand, provide a matte finish and work exceptionally well for oily skin types. They’re more forgiving and easier to blend, making them ideal for beginners. Liquid contours offer versatility and buildable coverage, working well for most skin types when set properly with powder.
Choosing the Perfect Shade
Selecting the correct contour shade is perhaps the most critical decision in your contouring journey. The shade should be one to two tones darker than your natural skin color, appearing as a shadow rather than a different color entirely. A common mistake is choosing a contour that’s too warm or too cool, which can result in an unnatural, orange-like or grayish appearance. For fair skin tones, look for cool-toned shades with taupe or ash undertones. Medium skin tones benefit from warm bronze or chocolate shades, while deep skin tones should look for rich, cool-toned browns that don’t appear red or orange.
- Match undertones: Cool skin tones need cool contour shades
- Test in natural light: Always check your shade in daylight
- Consider the season: Skin tone changes throughout the year
- Invest in quality: Better formulas blend more seamlessly
- Start subtle: You can always build up the intensity
Don’t forget about highlight shades, which are equally important for achieving that coveted sculpted look. Your highlight should be one to two tones lighter than your skin, with a luminous or glowing finish. Cream highlights work beautifully with cream contours, while liquid or powder highlights complement their respective contour formulas. The combination of well-chosen contour and highlight shades will create the dimension and depth that make your features pop.
Essential Tools for Professional Results
Having the right tools can make or break your contouring experience, transforming a potentially frustrating process into a smooth and enjoyable one. While professional makeup artists use an extensive collection of brushes, you can achieve stunning results with just a few essential tools. The key is understanding how each tool contributes to the final look and selecting quality options that work for your skill level.
A contour brush with an angled edge is perhaps the most important tool in your arsenal. This shape allows for precise application along the hollows of your cheeks, jawline, and forehead. Look for brushes with densely packed bristles that pick up product evenly and distribute it smoothly. A large, fluffy blending brush is essential for diffusing harsh lines and creating that seamless, airbrushed finish. Additionally, a smaller detail brush helps with precision areas like the nose and around the hairline.
Beyond Brushes: Other Valuable Tools
While brushes are fundamental, other tools can elevate your contouring game significantly. A high-quality makeup sponge, particularly the iconic pink or purple wedges, works wonders for blending cream and liquid products. The key is to use the damp sponge’s edges for precision blending and the flat sides for larger areas. Some makeup artists swear by specific techniques using their fingers, as the warmth of your skin can help products melt together beautifully, though this approach works best with cream formulas.
- Angled contour brush: For precise application and sculpted lines
- Blending brush: For seamless, diffused edges
- Detail brush: For nose and small areas
- Makeup sponge: For blending cream and liquid products
- Setting spray: To lock everything in place
Maintaining your tools is equally important as selecting quality options. Clean your brushes regularly with gentle shampoo or brush cleaner to prevent product buildup that can affect application. Replace sponges frequently, as they harbor bacteria over time. Clean tools not only perform better but also protect your skin from breakouts and infections. With proper care, your tools will serve you well for years to come.
Step-by-Step Contouring Application
Now comes the moment you’ve been waiting for—actually applying the contour to your face. Follow these steps carefully, and remember that practice makes perfect. Start with a clean, moisturized face and apply your regular foundation and concealer before beginning the contouring process. This creates a blank canvas and ensures your contour blends seamlessly with your base makeup.
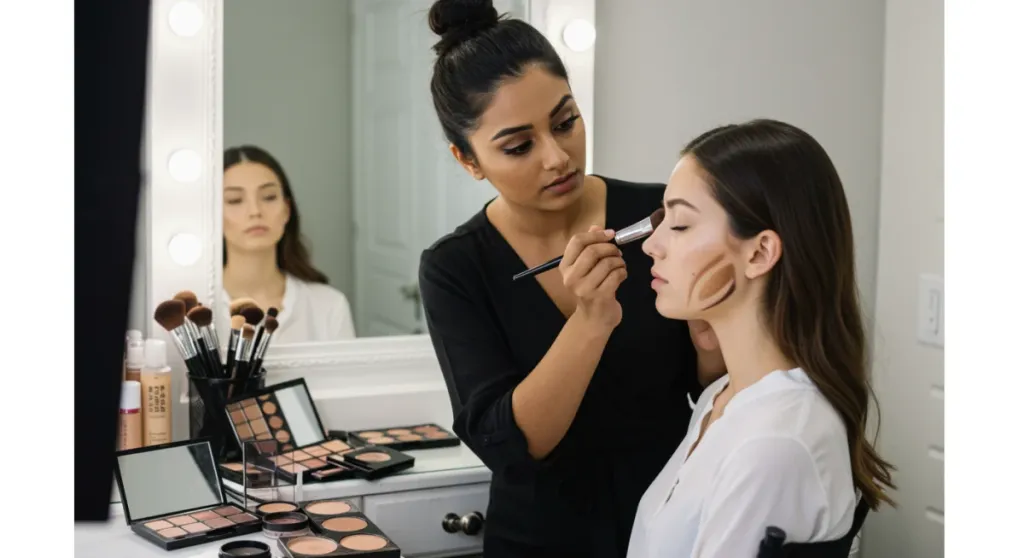
Begin by identifying your cheek hollows. To find this area, suck in your cheeks as if making a fish face—the hollows that appear are exactly where you’ll apply contour. Using your angled brush, pick up a small amount of product and start at the ear, sweeping downward and inward toward the corner of your mouth. Stop about two inches from the corner of your mouth to avoid over-contouring. The goal is to create a shadow that follows the natural contour of your cheekbone, not a straight line across your face.
Contouring Other Face Areas
After your cheeks, move on to the forehead by applying contour along the hairline and the sides. This creates depth and helps frame your face beautifully. For the jawline, apply product along the bone from your ear down to your chin, focusing on the areas where shadow naturally falls. The nose contour requires a light hand—apply subtle shadow on both sides of your nose bridge, blending carefully to avoid harsh lines. Some people also benefit from a subtle contour under the bottom lip to define the lip shape.
- Cheek hollows: Sweep from ear toward mouth in a diagonal motion
- Forehead: Apply along hairline and sides for framing
- Jawline: Follow the bone structure for definition
- Nose: Subtle shadows on either side of the bridge
- Under lip: Light contour to define the lip area
Once you’ve applied contour to all areas, it’s time to blend. Using a clean blending brush or damp sponge, work in gentle circular motions to soften any harsh lines. The key is to blend until you can’t see where the contour begins or ends—it should look like a natural shadow on your face. Take your time with this step; rushing the blending process is where most beginners go wrong. Step back from the mirror periodically to check your progress from different angles and lighting conditions.
Applying Highlighter for Maximum Impact
Highlighter is the secret weapon that takes your contour from good to extraordinary. While contour creates shadows and depth, highlighter brings forward the areas you want to emphasize, creating that coveted dimensional look. The strategic placement of highlighter can make your cheekbones appear higher, your nose straighter, and your overall complexion more radiant and youthful.
Apply highlighter to the high points of your face where light naturally hits. This includes the tops of your cheekbones (directly above where you applied contour), the bridge of your nose, the brow bone just above your eyebrow, the center of your forehead, and the cupid’s bow on your lips. For a natural look, choose a highlighter with a satin or pearl finish rather than chunky glitter. Cream highlighters blend seamlessly over cream contour, while liquid formulas work beautifully when applied with fingers or a damp sponge.
Highlighter Techniques for Different Finishes
The type of highlighter you choose dramatically affects the final look. Liquid highlighters offer the most versatility and a natural, dewy finish that works beautifully for everyday looks. Powder highlighters provide a more intense, long-lasting glow and are ideal for oily skin types. Cream highlighters deliver a luminous, skin-like finish that works exceptionally well for dry or mature skin. For special occasions, some makeup artists layer different highlighter types for maximum impact.
- Cheekbone tops: Apply above contour for dimension
- Bridge of nose: Creates a straighter, more defined nose
- Brow bone: Lifts and opens up the eye area
- Center of forehead: Draws attention to the center face
- Cupid’s bow: Enhances lip shape and fullness
Remember that less is often more when it comes to highlighter, especially for daytime looks. You can always build up the intensity if you want a more dramatic effect. The goal is to create a natural-looking glow that appears to come from within your skin, not a stripe of obvious highlighter sitting on top. Blend thoroughly and set with a light dusting of translucent powder if you have oily skin or want extra longevity.
Setting and Blending for Long-Lasting Results
The final step in your contouring routine is setting everything in place to ensure your hard work lasts throughout the day. Without proper setting, contour and highlight can fade, slide, or look greasy as your skin produces oil throughout the day. This step is particularly important in humid climates or for those with oily skin types who need extra staying power.
After blending your contour and highlight to perfection, wait a few minutes for products to settle into the skin. Then, lightly dust a translucent setting powder over areas where you applied cream or liquid products. Use a large, fluffy brush and a light hand—you want to set the products, not cake additional product on top. Focus on the T-zone and areas prone to oiliness, while using less powder on dry areas. For liquid highlighters, consider using a setting spray instead of powder to maintain that dewy finish.
Troubleshooting Common Issues
Even with the best techniques, issues can arise during the contouring process. If your contour looks orange or too warm, you’ve likely chosen a shade that’s too warm for your skin tone—go back and select a cooler shade. If your contour appears gray or ashy, the shade is too cool or dark; try a warmer, more neutral tone. Harsh lines usually indicate insufficient blending—spend more time with your blending brush or sponge.
- Orange tone: Choose a cooler, more neutral contour shade
- Gray or ashy: Select a warmer, less cool-toned product
- Harsh lines: Blend more thoroughly with a clean tool
- Cakey appearance: Use less product and better blending
- Fading throughout day: Set with powder or setting spray
Remember that practice makes perfect, and even professional makeup artists spent years perfecting their contouring technique. Take photos of your looks to track your progress and identify areas for improvement. With time and patience, you’ll develop your own signature contouring style that enhances your unique features and makes you feel confident and beautiful.
Conclusion
Mastering face contouring opens up a world of possibilities for enhancing your natural beauty and expressing your personal style. From understanding face shapes and selecting the right products to learning precise application techniques, this comprehensive tutorial has equipped you with the knowledge and skills needed to achieve professional-quality results at home. Remember that contouring should enhance your features, not transform you into someone else—embrace your unique bone structure and use these techniques to highlight what makes you beautiful. With practice, patience, and the right tools, you can confidently create flawless, sculpted looks that last all day and make you feel like a true makeup professional.
| Key Point | Brief Description |
|---|---|
| Face Shape Analysis | Identify your face shape to determine where to apply contour for the most flattering, balanced results. |
| Product Selection | Choose cream, powder, or liquid formulas based on your skin type and desired finish. |
| Essential Tools | Invest in quality brushes, sponges, and setting tools for seamless application and blending. |
| Application Order | Apply contour to cheek hollows, forehead, jawline, and nose, then add highlight to high points. |
Frequently Asked Questions
The best contour shade for beginners is one to two tones darker than your natural skin color with neutral or cool undertones. Avoid shades that are too warm, as they can look orange on most skin tones. Start with a powder formula since it’s easier to blend and more forgiving than cream or liquid options. Test shades in natural lighting before purchasing to ensure the most natural-looking result.
To avoid looking muddy, use a light hand and build up product gradually. Blend thoroughly using circular motions with a clean brush or damp sponge. Choose a contour shade that matches your skin’s undertone rather than opting for a dramatically different color. Make sure to blend until you can’t see where the contour begins or ends, creating a seamless transition between the contoured areas and your natural skin.
You should apply contour after your foundation and concealer. Creating a smooth base first ensures your contour blends seamlessly and looks natural rather than appearing as a stripe of color on top of your skin. Some makeup artists prefer to apply contour before setting powder but after base products, while others apply it after setting powder for a more subtle effect. Experiment to find what works best for your technique and desired finish.
Choose your contour formula based on your skin type and experience level. Cream contours work best for dry or mature skin and offer the most natural finish, but require more blending skill. Powder contours are ideal for oily skin and beginners due to their forgiving nature and easy blending. Liquid contours offer versatility and work well for most skin types when properly set. Consider your skin type, skill level, and desired finish when making your selection.
To make your contour last all day, start with a well-prepped, moisturized face and use a primer suitable for your skin type. Apply and blend your contour, then set it with a light dusting of translucent powder, focusing on areas prone to oiliness. Finish with a setting spray to lock everything in place. For particularly long days or special events, consider using a contour stick or cream that sets to a powder finish for maximum longevity without touch-ups.
Conclusion
Mastering face contouring opens up a world of possibilities for enhancing your natural beauty and expressing your personal style. From understanding face shapes and selecting the right products to learning precise application techniques, this comprehensive tutorial has equipped you with the knowledge and skills needed to achieve professional-quality results at home. Remember that contouring should enhance your features, not transform you into someone else—embrace your unique bone structure and use these techniques to highlight what makes you beautiful. With practice, patience, and the right tools, you can confidently create flawless, sculpted looks that last all day and make you feel like a true makeup professional.